Search This Blog

Wednesday, December 30, 2015

Valentine's Day Cards

Ok after I broke out my copics and was digging around for some pp and stamps I started getting in the mood for a little V-day cards. So armed with way too many supplies for inspiration I ended up just making a few simple cards.

I bought this stamp last year way past Valentine's Day on some sale so I was happy to use it.

 
And this was a combination of some fun confetti stamps from Papertrey Ink to make that background, plus I found a few heart stamps to add to it. I have decided I don't own enough pink colored inks. I did manage to make out with what I had but adding some pink to the shopping list.

Monday, December 28, 2015

Just For Fun

I decided to take a little break from my December Daily or a short pause if you will. I signed up for a coloring class to enhance my skills. Mostly I wanted to learn more skills for skin and hair so that's what the class is focusing on. After playing around with the copics I decided I needed to test some of what I am learning, mostly adding contrast. I probably should have used a stamp with a person on it but for some reason I wanted to do something with some flowers, perhaps longing for a bit of spring now that winter is heavily upon us and everything is looking so dull in the yard.


Wednesday, December 23, 2015

Daily December 6-10 PLUS Superman PJs

Well things are going far better for me than last time I worked on my DD and am working on day 11. Hopefully I can get caught up in the next few days, but I am skeptical since there is so much work to do towards Christmas Eve and Christmas itself.

I also managed to finish a couple of Superman Tees for the boys for their pj pants. Have to say I was limited to product on hand and I didn't want them to be exactly the same so I made one in a light blue and the other in red. The pants are a nice cozy flannel so should be great wintertime PJs.


And here are my DD pages. It is ironic how everything is kind of a mish mash. I am just trying to use products I have on hand and have gotten away from what I started with.


Well that's it for today, hope everyone is ready for the Holidays!

Monday, December 21, 2015

December Daily - Day 4 and 5

I must say I had hoped to have at least 4 pages to share today, but alas Murphy as in Murphy's Law was against me. The first half of the day I cleaned my room, spic and span and after admiring it's neat and tidy appearance I settled in to work on my December Daily.

All went well until I tried to print some pictures to my wireless printer. Alas the next 4 hours, yes you ready that right the next 4 hours were devoted to debugging why it wouldn't print to the printer, installing drivers, changing ink or rather attempting to change ink I never could get the cartridge to install and have to buy more, reinstalling the wireless software and general research on the web. Argh!!! not how I wanted to spend my afternoon. I finally gave up and switched to my home computer/printer and was able to complete only 2 pages at this point.

Perhaps I will have better success on my next attempt.

So here are Days 4 and 5.

Day 4 was a Me day, a trip to Massage Envy for a massage followed by a facial. I think I need that again today after my struggle with the damn printer. I did have to steal some photos off the internet because I didn't see asking the girls to take photos of me during my treatments and I think this still gets the message across.

 
Day 5 was about spending a day with my mother. I was going to print a picture of some earrings I bought but after my frustrations with the printer I decided I didn't need any more printing. I had planned to embellish a bit more but at this point I was just glad to have something done even if it was halfway.


I bought the succulents to create a little mosaic if you will with them. I needed some other plants that I didn't buy at the time so still need to finish this. I think after cleaning my room I have decided that seems to be the theme of my life..need to finish..I have so many unfinished projects and setting goals to get them done in the next few months, or at least work on getting them done.

Wednesday, December 16, 2015

December Daily - Day 2 and 3

Well I am not progressing too quickly on these pages, mostly because I have other things I need to get done but am focusing on taking photos and more importantly keep track of what I wanted to showcase for that day. I have a long running list at this point but that's ok I hope to catch up once I am off work.

For Day 2 I had run out and purchased some last minute just for fun gifts for the boys, some Disney vans and dummy had them over and I didn't take a single picture..ugh! They were estatic to have them. With Disneyland still fresh on their mind I was sure they would be a hit.


Not much going on for the third, to be honest my life is pretty boring so I took a snapshot of the weather because we seemed to be going through a bit of a cold spell. I know, I know 39 degrees is not cold for a lot of you but heck when you are used to mid 60s as a high with a low of being in low 50 it's pretty chilly to me. 


Well that's it for now, hopefully I can whip out the rest of the pages, but right now I have to say my room is in desperate need of a good cleaning and organization workout. I plan to or rather hope to get that done this weekend. 

Monday, December 14, 2015

Christmas PJs

Well as you can see No DD here today, LOL I am so far behind I don't want to even think about it. For right now I had a deadline to get stuff done that for me was more important than DD and I can pleasantly say that these PJs have now been crossed off my list, well these pairs plus some superman ones that I made for gifts for the grandbabies.

 
I bought the fabric back when Halloween was still amping up and kept thinking I would have gotten to them before now, but I made my deadline and the boys will have these for Christmas AM pictures. I really wanted to do some tee shirts but ran out of time. I may do some on a last minute whim but for now I would rather get some sort of matching superman ones made for their gifts.

Any hoo here they are. I couldn't find anything special for the littlest guy but saw the striped and it reminded me of candy canes. Then while I was cutting them out I thought it would be fun to take excess fabric and make contrast cuffs at the bottom since I see that a lot on Pintrest.


Unfortunately Zack's band isn't as large because it was after all an after thought and when I bought the material I only bought enough to make the pair of PJs. And if you look closely you can see where I added double top stitching to give just a little bit of extra detail. 

 
I have to say if you've never sewed and wanted to, PJ pants are pretty damn simple and take about 15-20 min to make.

Wednesday, December 9, 2015

December Daily - Day 1

So I was able to get another page done and working on day 2, I am trying not to look too far ahead and see how far behind I am in hopes that I will actually get caught up one day.

This photo marks the return of our Elf Enzo. He is quite the character this one. Love setting him up for my son and when I get home my son sets it up for me.

For my theme I have decided to go with Silver and Gold focusing on either color. This seems to be working thus far.


Today is day 9 only 7 more days I need to catch up on. Easy, right!

Monday, December 7, 2015

December Daily - Title Page

I have to say I honestly wasn't sure if I was going to do DD this year or not. I didn't really plan or gear up for it and then at the last second I decided to go for it.

To get some inspiration I looked through my previous years and was shocked to find 3 full days missing in 2014, ugh! I am pretty sure I have photos but just didn't pull together the page, at least that's what I am hoping for.

After getting through that shock I started to pull papers from my stash trying to figure out some sort of color scheme for my DD and came across a bunch of Teresa Collins pp that I picked up at an expo at some point.

I used my QK Diesel font to cut out the 2015 in glitter paper and wanted to use gold but I didn't have any on hand so settled for the silver. I then found some gold vellum to use for December. It was so faint that I decided to back it on white to help it pop out a bit, then added additional silver and gold star sequins for a bit more glimmer.


I must say I think this probably looks better IRL because it's hard to see the shimmer from the glitter paper and sequins.

So here it is December 7th and I am completely behind.


Wednesday, December 2, 2015

Cranberry Bliss Bar wanna be's

I so love those Starbucks cranberry bliss bars and actually indulged when I went to Disneyland and ate an entire bar to myself. Normally I try to split one with my husband. I reasoned that I would be actually walking it all off.

Earlier this year I found this recipe and OMG! they taste like the real thing well IMO a bit better than the real thing so I am adding this recipe to my Christmas baking list. Definitely gift giving worthy.

I made this batch for work but of course keeping a few bars for the home to treat myself and my family with.

And if you love these bars read on because I am including the recipe with this post.


Ingredients


Cookie  Bar

1 cup (2 sticks) butter, softened
1 1/4 cups light brown sugar, packed
3 eggs
1 1/2 teaspoons vanilla
1 teaspoon ginger
1/4 teaspoon salt
1 1/2 cups all-purpose flour
3/4 cup chopped dried cranberries
6 ounces white chocolate, chips or cut into chunks

Frosting

4-ounces cream cheese, softened
3 cups powdered sugar
4 teaspoons lemon juice
1/2 teaspoon vanilla extract

1/4 cup dried cranberries

Drizzled Icing

1/2 cup powdered sugar
1 tablespoon milk
2 teaspoons vegetable shortening

1. Preheat oven to 350°F.

2. Make base by beating butter and brown sugar together with an electric mixer until smooth. Add eggs, vanilla, ginger, and salt and beat well. Gradually mix in flour until smooth. Mix 3/4 cup chopped dried cranberries and white chocolate into the batter by hand. Pour batter into a well-greased 9x13" baking pan. Use a spatula to spread the batter evenly across the pan.


Bake for 35 to 40 minutes or until light brown on the edges. Allow to cool.  (Mine was probably a tad over done by2-3 minutes)


3. Make frosting by combining softened cream cheese, 3 cups powdered sugar, lemon juice and vanilla extract in a medium bowl with an electric mixer until smooth. When the cookie bar base has cooled, use a spatula to spread frosting over the top of the cake.

4. Sprinkle 1/4 cup of diced cranberries over the frosting on the cake.

5. Whisk together 1/2 cup powdered sugar, 1 tablespoon milk, and shortening. Drizzle icing over the cranberries in a sweeping motion or use a pastry bag with a fine tip to drizzle frosting across the top of the cake.


6. Allow bars to sit for several hours, then slice. I cut mine into bars but if you want the Starbucks look then slice the bars lengthwise (the long way) through the middle. Slice the cake across the width three times making a total of eight rectangular slices. Slice each of those rectangles diagonally creating 16 triangular slices.

Makes 16 bars.

Monday, November 30, 2015

Floral Quilt

This is my last quilt that I needed to complete for Christmas gifts, whew! Glad to have that done and over. I saw this gorgeous fabric when the fat quarters shop had a sale. I normally don't hoard fabric, at least I try not to but I saw this fabric and bought it with no real plans for it, just knew I wanted to make something with it.

Then the idea came to me I would gift this to my chiropractor. The women has been a saint to me, I couldn't stand going to one and she is gentle and super uber nice. The kind of person you wish you had spent more time with growing up. She is just a fascinating person who happens to sew or she did but hasn't done much of it lately. I am hoping to change that.


Any how instead of gifting her money or a gift card or whatever I thought she would like a quilt. This one is small and considered to be basically a lap quilt perfect for cuddling up with on the couch and a good book which she does a lot of.

I did all the quilting free motion on my machine. It was a chore but I loved how it came out and much better than paying someone $$$ to do it on a fancy schmancy machine.

This is one gift I am very excited to be giving this year.


Wednesday, November 25, 2015

Classy and Elegant Card

So I am diverting backwards as this card was actually completed for Day 3. I decided to use some water colors and then added in some stickles for the berries and gold droplets then finished it with a few sequins, red twine and gold bells. 
 
The Holly stamp is from Clearly Besotted and the sentiment stamp is from Penny Black. I think this maybe the first or second time I have used it over the past five years. I have this terrible affliction of buying things thinking I will use them then get them home and struggle with actually using them. 


Monday, November 23, 2015

Cute and Whimsical Cards

Continuing on with my online card class I am sharing two cards I made that are supposed to be in the Cute and Whimsical category. I have to say just getting back from Disneyland this was a bit of a challenge to get done. My mojo really wasn't in full swing trying to catch up. This is day 5 and the class is on day 12..yikes!

Up first is this fun little guy from My Favorite Stamps. I really like these little dudes, so fun to color them.


And this other one is using stamps/dies from Lawn Fawn as well as the MTF mountain range die and the Merry die is from Clearly Besotted. The falling snow stencil is from Simon Says Stamp.


Wednesday, November 18, 2015

Christmas Love

Today I have more cards but not from the online class just my need to do some more coloring with my Copics.


Monday, November 16, 2015

Holiday Style - Clean and Simple

Hello fellow bloggers, today I am sharing not one but two cards I made for an online class called Holiday Style. I took a similar class last year and really wasn't that impressed, this year seems to be a bit better.

I am behind because they are on day 6 and I have just begun. I guess it doesn't help I am on my way to Disneyland so most of my efforts have been geared towards the trip.

So they gave us three different clean and simple cards but eh I can't say that I think they are completely clean and simple but I do like the idea of what they have shown us.

The first one uses stamp repetition as well as the suggestion of bending your stamps so that's what I did here. I feel like it's missing something not sure what but I am not very happy with the card.

I used a template for the snow and tried to use a white gel pen to add more snow on the tree but it wasn't showing up much, I then decided to use a stylus tool to dot the glitter embossing paste and once it was fairly dry I squashed it down to mimic the template look.

Stampscapes - Lg Tree Cluster
Papertrey Ink - Season's stamp, Ink
Aleenee's Glitter Snow Embossing Paste
Simon Says Stamp - Falling Snow Template


This next card was for the clean layers look but I didn't have the die that they used so I am just improvising and doing my own thing based on their use of watercolors and snowflakes. I did dbl cut the snowflakes and then popped up the second layer for a bit of dimension.


I added a bit of shimmer to the card using radiant pearls splattered as well as glitter confetti stars and cut Joy out of diamond plate paper.

Kuretake Gansai Tambi - Waterolors
Simon Says - Snowflake Dies
Papertrey Ink - Joy Die and stamp
Other - glitter confetti, radiant pearls

Wednesday, November 11, 2015

Holiday Joy

Nothing special here just a cute little deer from Lawn Fawn and using up some much older pattern paper. I really love it when manufacturers give us the dies that go with their stamps so much easier than having to fussy cut and lets face it, a much cleaner look.


Monday, November 9, 2015

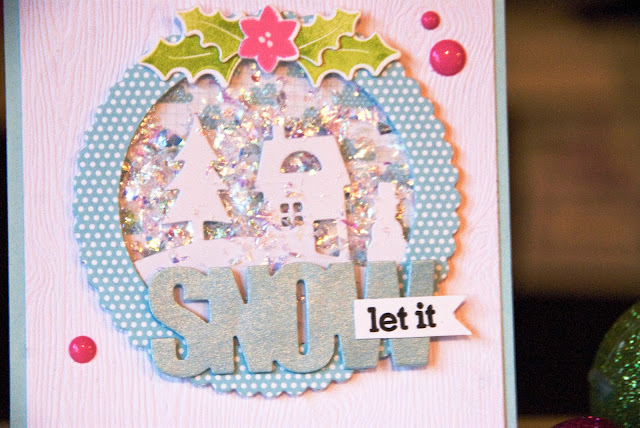
Let It Snow - Shaker Card

I bought this lovely chunky glitter last year because it reminded me of snow. Its been sitting on my desk ever since, waiting patiently to be used. Well at last its chance to sparkle has arrived.

Using the Papertrey Tinsel and Tag die kit along with their Snow die which has coordinating stamps I created this fun little shaker card.

I will say this card was a bit tricky due to the scene I wanted to place inside, in the end I figured it out and while it's not a loose shaker card I think the concept is there.


Papertrey Ink - Snow Die, Let it stamp, Holly Leaves stamp and die, pointsetta stamp and die, shaker card die, scene it or Make It Tinsel and Tag dies
 
Lawn Fawn - Pattern Paper
Simon Says - Embossed cardstock
Other - Enamel Dots

Wednesday, November 4, 2015

Christmas Cards - No Peeking

Keeping it simple.  I am using MTF stamp/die elf combo that I colored with copics and a sentiment die from Penny Black. I also used the MTF stitched die as an embossing element.

I have to say these little elves are super cute and remind me of those elves from the Rudolph The Reindeer movies. I still like to watch those at Christmas Time, they seem so nostalgic.


My Favorite Things - BB Santa's Helpers Dies and Stamps, Die-namics Basic Stitch Die
Pebbles  - We Go Together Pattern Paper
Penny Black - Sentiment Die
Other - Enamel Dots

Monday, November 2, 2015

Christmas Time

Halloween is now officially over at my house, all the decorations have been put away and I started on my Christmas Cards. I have to say it feels strange to be starting these but since I also started my Christmas shopping last week I guess it really shouldn't. We all know how time flies and next thing you know Christmas will actually be here so I guess it's best to get a leg up while I can.
Keeping it a bit simple this week. I stamped the sequin tree and die cut that plus two more from pp and of course added a few sequins for decoration. I also added some glitter snow to the background using a falling snow template. And then stamped the sentiment and popped up the center tree.


MFT - Tree Stamp and Dies
Papertrey Ink - Sentiment Stamp, Ink
Simon Says Stamp - Falling Snow Stencil, Stitched Rectangle die
Aleene's - Glitter Snow Paste
Chickinadiddy - Pattern Paper
Other - Sequins

Wednesday, October 28, 2015

Disney - Wait Bags

Another project I am completing are these wait bags for lack of a better term. Basically I am filling bags with little toys and goodies to help keep the boys busy when they get tired or frustrated with waiting.

I have been on the hunt for little toys and then decorated the bags, Disney style. I have also armed myself with bubbles, a mini kaleidoscope, a lava toy, a rubberband powered butterfly and of all things a Instax camera ( I figured letting them take a picture and then having to wait for it to be developed would be a time killer)

Here are the bags, simple but effective since these will most likely get tossed. Made from Vinyl and Washi Tape


Hopefully these will be effective in helping little ones learn to wait their turn patiently.

Monday, October 26, 2015

Getting Ready for Disney

In a few short weeks I will be off to Disneyland with my youngest two grandsons and their mother. Needless to say this trip was actually planned for August of next year, but Disneyland decided to extend their Halloween season beginning in August which meant ride closures for the period we would be there so they can put up the ride overlays.

We then changed the date to May of next year but wouldn't you know it with their announcement of the new Star Wars land they are going to close Rivers of America, the railroad, Mark Twain riverboat and the Columbus ship along with the Pirates Lair or as I so fondly remember if Tom Sawyer island. Well darn it all we either wait 2 years longer or go now, we opted to go now.

My middle grandson suffers from Autism as so many children and people in general do. Since his disability isn't visible I had read about wearing shirts so that people can see he does have a disability and therefore hopefully will be a little more patient.

Therefore I made these shirts for the boys using my Cameo and some heat transfer vinyl. It's things like this project that truly makes me appreciate my electronic die cutter.


And for the littlest one


Wednesday, October 21, 2015

Halloween - Get Your Witchy On

As you can see I am still obsessed with water coloring and I have a confession. I purchased some Peerless watercolors and stupid me thought they were horrible until I realized I was using the wrong side (face palm) and now that I have them figured out I really like them. I also have some Japanese watercolors and used both on this card.

Funny I didn't figure out the coloring until after this card but I guess as long as I know now that's what matters.

The stamp is from Bella and really not too much on the coloring creativity since I copied what was shown on the package, why mess with a good thing. I was taken a back that the whole scene is one stamp since I was expecting at least three pieces.

Monday, October 19, 2015

Halloween - Ghostly Greetings

I used more watercolors trying to create a night scape. Using purple and blacks for depth and then I used both sliver mist and a white gel pen to create stars.

The witch was colored with copics and fussy cut. I also die cut the clouds from vellum and the moon was first stamped then die cut.

The ghostly sentiment was layered to give some thickness and the greetings was heat embossed.


Stamp is from Stampin Up
Ghostly die is from Memory Box
Greetings die is from Kraftin Kimmie
Clouds and Moon are from Paptertrey Ink