Search This Blog

Friday, February 28, 2014

Always Happy

Here is another picture I wanted to redo. And compared with how this picture had been scrapped before without even as much as some journaling, I am much happier with this version. Although I am not all that fond of it and have to ask myself if I will be redoing this page again in 5 years.

I started with one concept, stepping out of my comfort zone and then it went a whole other direction and I just kind of kept adding stuff trying to make it all work, in the end I am not sure that it all did. I think it's just too messy for me.  We are our own worse critics, aren't we?!?

And it just happens to be this little guy's birthday today, he is 22 years old. My how time flies.


Wednesday, February 26, 2014

Vanilla Bean Cake with Strawberry Frosting and Filling

It's been awhile since I shared a cake recipe so thought today might be a good day. I had my grandkids over for a post birthday celebration for two of them. And since the 3 year old won't care as much as the 14 year old over the cake flavor, I let the oldest decide. To my sruprise he asked for Strawberry.

I originally was going to make it all Strawberry but then decided it might be a bit much. I then opted for this Vanilla Bean cake, home made strawberry filling and frosted with a Strawberry Buttercream.

Recipes follow

Yield: 2 9” Cake Rounds

1 1/2 cup granulated sugar
1 vanilla bean
3 1/3 cups cake flour, not self-rising
2 1/4 teaspoons baking powder
3/4 teaspoon baking soda
3/4 teaspoon salt
1/3 cup unsalted butter, room temperature
3 large eggs, room temperature
1/2 cup full-fat sour cream
1/3 cup canola oil or vegetable oil
1 1/2 Tablespoon pure (not imitation) vanilla extract
1 cup (whole milk

Preheat oven to 350
Grease and Flour pans

In a small bowl, combine sugar and seeds from the vanilla bean. (Using the back of a spoon, move around the bowl and apply pressure to break up any clumps of seeds and to better infuse the vanilla flavor into the sugar. Set aside.
In a medium-sized mixing bowl or bowl of a stand mixer, mix together cake flour, baking powder, baking soda, and salt.
Add the vanilla bean sugar and mix until well combined.
Add butter and mix on medium-low speed for three minutes.  Because there is so little butter, you'll end up with a very fine crumb texture.
In a small mixing bowl, whisk together eggs, sour cream, oil, and vanilla extract until smooth.
Add the egg mixture to the flour mixture and beat on medium speed until just combined.
Slowly add milk and mix on low speed until just combined.  The batter will be liquid. 
Bake for 20-25 minutes and then test to see if they are done. They are done when a toothpick comes out clean. 


Frosting

1 cup (2 sticks) butter
1/4 teaspoon salt (if using unsalted butter)
4 cups powdered sugar
1 teaspoon Strawberry extract
2-3 tablespoons Strawberry Puree (from the filling below)

Directions-
In the bowl of an electric mixer, fitted with the whisk attachment, beat butter (on medium speed) until completely smooth (30 seconds to a minute).
 Add salt (if needed).
 One cup at time, add 2 cups of powdered sugar, beating after each addition.
 Add strawberry flavoring
 Add about 1 tablespoon of puree, and continue beating.
 Add the remaining 2 cups powdered sugar, one at a time.
 Add an additional 1-2 tablespoons puree until desired consistency is reached.  Let mixer beat the frosting for a good 5 minutes after the final puree.

Filling

3 C Chopped Strawberries
½ C Sugar
2 ½ Tablespoons cornstarch

Puree the strawberries and reserve ¼ Cup for the frosting
Bring all the ingredients to a boil in heavy saucepan, stirring constantly.
Boil for 2-4 minutes to thicken, stirring constantly
Remove from heat and pour into a bowl to cool

Assembling the cake

Split the cake layers and add filling between each layer, frost with butter cream frosting. Enjoy!

Monday, February 24, 2014

Redoing a page

I think it's the first cardinal rule of scrapbooking, thou shall not redo. Well sorry to say I have grown so much from those first days about 15 years ago, I just couldn't let this photo sit in the manner it had been scrapped..and sadly ladies this is not the first time I've redone it. How sad is that..but I swear this is the last time, I promise. I really like how it turned out.

So confess have you ever redone a page before or am I the lone sinner?


Friday, February 21, 2014

Cards for Mother and Daughter

Or rather Aunt and Cousin. Basically the first card is for my mother's Aunt who will be turning 100 in a few months. I wanted to make something special for her. Something cheerful and colorful.

The other card I previously made for a contest and thought it would be great to send to my cousin (once removed or second cousin as they say).

Any hoo, unfortunately she had a bit of stroke and I wanted to send her a get well card. Thankfully she is doing well and it was just a small one but I wanted to let her know we were thinking of her.


Wednesday, February 19, 2014

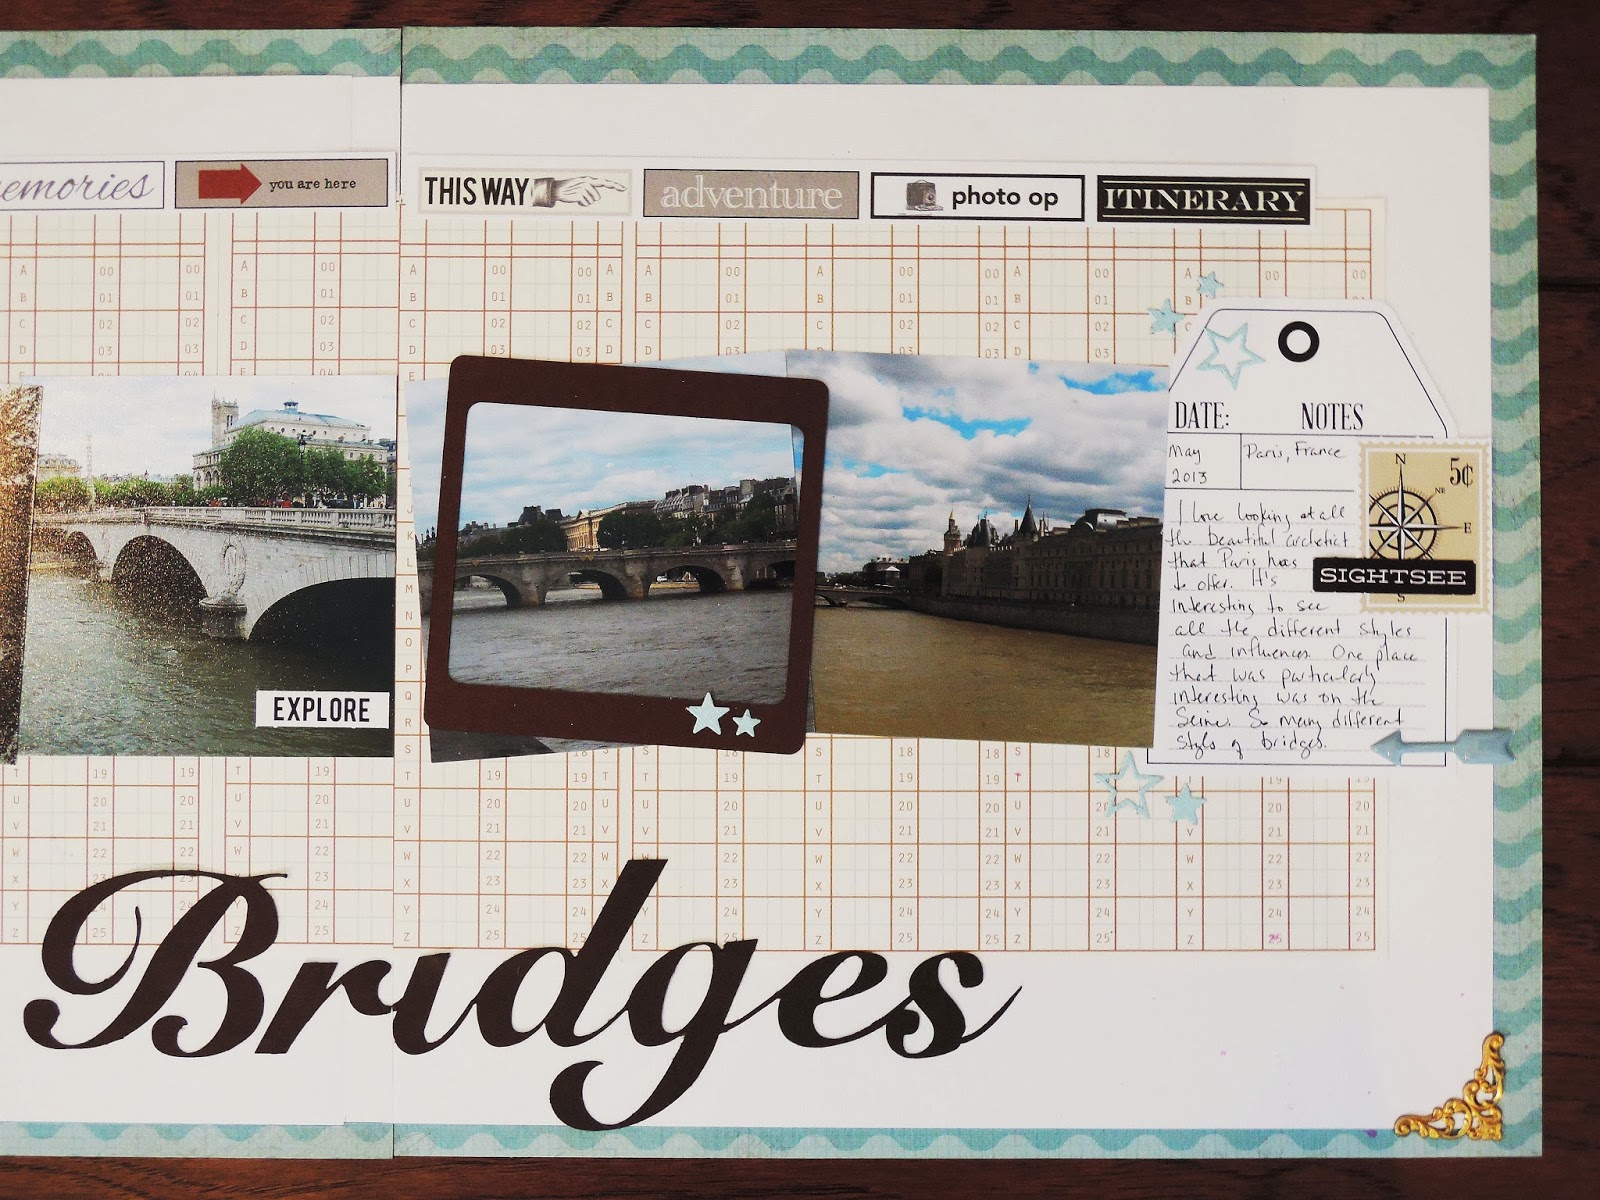
Paris, France - Bridges

I needed to get back to finishing up my Europe trip from last year. Have a few more pages left and then France will be done and I want to move on to London. Secretly I am hoping I could do Project Life but have to wonder how odd it would be to have half the album regular layouts and the other have Project Life.

Any hoo I loved all the architecture in Paris and thought the bridges on the Seine offered a good sampling of the different styles through the years.

I loved that 3D Paris sign. You see those at the expos all the time and figured what they hey..I could use that.


Monday, February 17, 2014

Guy Birthday Cards

The other day I was driving home and I saw one of the new VW Bug cars and I was admiring the shade of grey that also had a wee bit of color added to it, which inspired me to try something similar. The car was grey and red and I thought maybe a little green instead would work here. DH will be 56 this year and I figured making him a birthday card now even though his birthday is months away would be as good as any.

I have to say I did enjoy the color scheme and thought this would also work well for a anniversary card.


This card I made for my grandson since I didn't get to celebrate his birthday with him this year but will be making him dinner and a cake this coming weekend I thought it might be fun to make him a belated birthday card and let me exercise my word bubble die.


Friday, February 14, 2014

ReOrganizing the Craft Room - 3

So in my previous post we saw my desk and now I take you to the corner as well as behind me and to the right and to the left.

First up to give you a better idea of my entire workspace which isn't just limited to the desk and shelving above and on top.

As you can see I have a corner piece where my Clip it up that I was fortunate enough to win sits and then to the right another set of adjustable shelves.


And underneath the area where my Clip it up sits are my inks which are set in a cassette holder box that my friend gave me and then on top are my copics

After taking this picture I am ashamed that underneath didn't get painted but I guess since I don't really see it I never noticied it before.

I store my copics in these acrylic boxes from the Container store, I think they are about $3-5 each. I love having them in this and then I just pop on the lid and they are easily transported to a crop.

Now here is the other shelf to my right. I did reogranize this a bit by getting rid of a bunch of jars that held paper flowers (that my bff is happy to take off my hands) and then used some baskets to store my paints, stencil supplies, dies and washi tape. (I basically was using these storage containers before but after reorganizing a few things for aesthetic purposes I had them leftover so I found new uses for them)


I keep most of my dies in baggies that I labeled and put them in a basket and I also have a few in my artbin on the shelf. Nothing too fancy but it seems to work.


I keep my embossing folders in this sterilite container which again works handy when you're headed off to a crop.


And under my shelf is another Ikea cabinet. And the best thing about this is it's shorter than the desk so it fits neatly beside it and not too deep so the drawers from the Ikea file cabinet can still open. I have my Cricut bug right at an arms reach without taking up desk space. I can't tell you how much I love that. And see that hand crafted clay mug, my oldest ds made that for me eons ago and I uncovered it in the closet cleanout so I knew it needed to be seen so I could cherish it, especially now that he is going to be 31 this year.

And if you can read what's in the drawers you'll notice I keep my CB mats in there.


So a brief detour from the room to visit all the places I keep my punches and there are quite a few. I have two drawers for punches that are seasonal or that I don't use that often. Then you can see below I have taken a kitchen storage box from Target and hung them on the wall and keep my border punches as well as a few favorite.


And then I also keep a basket tucked under in my file drawer shelf which holds the most frequently used punches like circle punches.


And now behind me is the window seat that again my oh so talented hubby did for me. He was off at Christmas a few years back and decided to make me this but he loves to do trim work so he got a bit carried away with it and was much larger than I envisioned but I think it turned out great.

As you can see there are more shelf units at either end of the bench seat.

Behind that yellow pillow is where my kitty hides away from everyone that's why it's sitting up to make a semi secluded area for her.


Since taking this photo I added labels to these baskets. They keep my rolls of ribbon, toille, vinyl and little windows supplies.

And back to the closet side, this is the bookcase which got a bit of a make over too.


And lastly to the right of the desk I have two large baskets that hold all my project and pages in progress in giant zip lock bags, acrylic storage boxes and shopping bags.


So that's it. I hope you enjoyed an indepth look at my like craft room, it's not much but it works for me and always makes me happy to be in here and that's what really matters, right?

Now any takers on how long until this is messy again?

I hope everyone has a Happy Love Day!

Wednesday, February 12, 2014

ReOrganizing the Craft Room - 2

This is my desk setup. As I mentioned in my earlier post I was very fortunate that my dh built all of this for me except for the two Ikea filing cabinets. The desk top is a solid door that was stained and varnished. Being solid gives me the opportunity to sand it and restain and varnish if I were to badly damage it.

Here we have a bit closer look at the main shelves above


Lets examine a bit closely shall we what exactly is in these adjustable shelves.


As you can see besides having my papers seperateed by color, I have also have a shelf for 8.5 x 11 pp, there are bins for Project Life, Ribbon, Flowers, Chipboard, 6x6 pads and just odds and end stuff.

Below is what I purchased and organized for my PL items. I am using Linus bins that are either available in the kitchen or bath section at Ace Hardware, Container Store, Storables, Wal-mart and Target if you are lucky enough to find them.

I have two of these for the small cards


I then found these great plastic dipping and pill containers to hold some embellishments at the Containers Store. the dipping tubs were 6 for $5. The larger boxes were $1.99 each.


And additionally I am using these tin pailss and boxes


And then for my larger PL cards I have those in a plastic basket along with other plastic baskets which hold smaller chipboard alphas and all my odds and ends I hate to toss like punched borders or dies that I just hate to toss and try to reuse on some other project on my desk.


And lastly just a close up of the shelf sitting on top of the desk. Again my dh made the shelf and then on the top I added spice racks to give me better storage for all those small things like stickles, mists and way in the pack you can see my Tim Holtz ink pads. On the middle shelf in the plastic bin below are those small ink pads and some frequently used small stamps and {shudder} the metal tins full of eyelets and brads I have had forever.


Come back on Friday and I will share the rest of the room. My copic storage, the window seat behind me, the book case and where I keep all my punches.

Monday, February 10, 2014

ReOrganizing the Craft Room - 1

So my bff and I decided to challenge ourselves to re-organize our rooms after drooling over some pretty pictures of other people's craft rooms. These were my before pictures but in all fairness I had already pulled most of my stuff out of  my closet because while I have storage for most things, the closet was a mess. 


I am fortunate that my husband built my shelving unit over my desk with adjustable shelves, as well as a windowseat bench that has storage at both ends plus storage underneath.

My room is a mere 10 x 10. Nothing too elaborate and I am one of those people who likes everything within arms reach and for the most part it all is.


So now you have seen what a mess it was before and now we add a few changes.

First off I needed to get rid of all the wrapping supplies from the closet. These are everyday ones as I keep the Christmas ones outside in the garage in their cupboard.

I purchased the Elfa system from the Container store to hold all the misc stuff I had instead of just piling on top of piles in the closet.


After relocating all the wrapping supplies, I then proceeded to purge myself of stuff I just didn't need or want into two piles; garbage and donations. I think I made 4 trips to the garbage can and just two boxes for donations. Not too bad. I just tend to hoard things I believe I can repurpose and needed to let some of that go. Not all but some.

After 3 trips to Target here is what the closet looks like. I added a curtain from Pottery Barn kids and proceeded to label all the baskets. I also purchased shoe storage racks to give more storage on the top shelf.


Next up I have my stamp storage. Now to confess I already purchased these stamp drawers but added some missing labels (which were added after I took these photos) and just wanted to share with you what I use.


This is a nice insert to have for these drawers, as you can see it holds lot of little embellishments.


So come back on Wednesday and we will explore my desk, the main shelves, storage for Project Life and those pesky embellishments you tend to use with PL.