Search This Blog

Wednesday, February 27, 2019

Wishing You - Colorburst

So you might remember my previous playtime with colorburst and how unhappy I was with the watercolor effect on watercolor paper well I was messing around with it again and accidentally grabbed Tim Holtz's stamping paper, let me tell you the effect and vividness I received once I misted it with water was breathtaking.

I did a second panel and again was overjoyed with the results. I went ahead and used one panel to make a birthday card but have to tell you working on the final touches I was pretty sloppy so it's not all nice and neat as I would have liked but I guess the older you get the more you learn to roll with the punches.

To be honest the camera really doesn't capture all the vividness you see with the eye but its a good resemblance. Also I am using MFTS new stamps and dies with this card which will probably go to my other son's birthday.

Monday, February 25, 2019

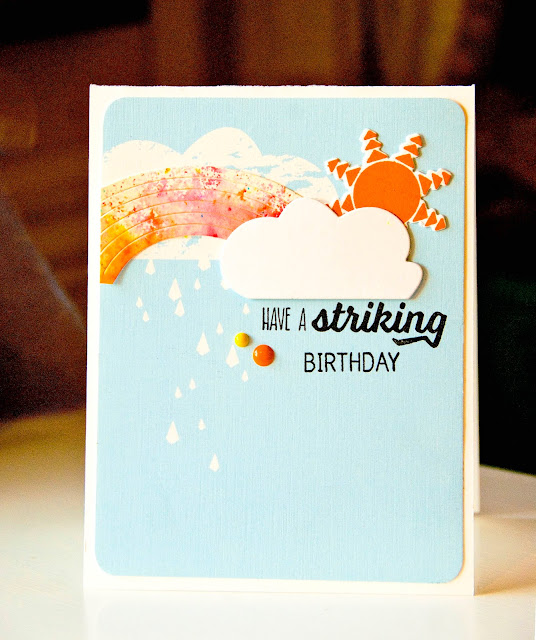
Have A Striking Birthday

This is the last of my February birthday cards, thank goodness. I did luck out a bit and was able to send my grandson a birthday text instead of a card since he's away at college.

I am using a very old very unloved stamp and die set from Papertrey Ink, to tell you the truth I am not even sure why I bought this set I think I had a moment of designer envy when I saw a DT card perhaps. I also had their pp so used a bit of that as well.

I did add a rainbow from Memory box because lets face it a little extra color doesn't really hurt. And being the lazy person I am sometimes I didn't want to diecut a bunch of different colors to make a rainbow so I just used a bit of colorburst on watercolor paper and diecut that.

Well back to preparing for the upcoming expo this weekend. Planning a lot this time because I want to do a ton of layouts that I have been behind on. Hopefully this weekend will prove to be very productive.


Wednesday, February 20, 2019

Have a spook-tacular birthday!

Being behind on my birthday cards I needed to get crack-a-lackin so I finally got around to making a card for my grandson. He loves all things Haunted Mansion and when I say loves I mean LOVES LOVES LOVES HM. Thus I needed to make him a card with the hitchiking ghosts. Although he prefers the hatbox ghost I just knew my silhouette wouldn't be friendly cutting that silhouette out so I choose Ezra, Phineas and Gus, yeah they have names, how I did not know that until he told me is beyond me. And I call myself a Disney fan.

Originally I planned to just cut out the silhouette and use the negative space for the card but then I remembered this great background stamp from Stampers Anonymous and I wanted to use it somehow, so I found this great purple paper and heat embossed the stamped image to make it look like the HM wallpaper. But alas the stamp was way smaller that what I originally hoped to use it for so I had to mat if more than expected and then I decided I would use the cutouts and being white they really popped up of that background image both literally and physically (with the help of some foam tape.)

Only thing left was to come up with some kind of sentiment so using a couple of different stamps I pieced together a birthday sentiment and added a few enamel dots. Lets just say he will be over the top happy when he sees this and all the HM gifts I have for him.


Monday, February 18, 2019

Floral Birthday Card using Colorburst Powder

With my first expo around the corner I was reading the class descriptions and I noticed one of the watercolor classes was using this product called Colorburst by Ken Oliver. So intrigued I ordered some from Amazon and read the reviews beforehand to make sure it would be something I liked. 

My package came and sat of course until I could get some time to focus on it. The first watercolor panel I did I based with water then tapped the powder onto the card and watch is slowly bleed, it took forever so I helped it by mixing a bit..I didn't like that it washed the color out so I was disappointed. Next I sprinkled the powder on the card then spritzed it with water, this method is much better for vibrancy but I find that the color is thin and it takes finessing to get the right consistancy where the color is ontop of the card rather them seeped into it. Finally I took some powder and and put it in paint pallete the ever so slightly dampend a brush and started painting with it, a much better result because you get intense color and you can water it down to get various strengths or lightness of the color which I found incredibly easier to do than the no line painting method..in fact I really enjoyed these powders for painting than using any other product. I only have the Caribbean Brights for now so they will suffice I think for what I use. 

This image (Papertrey Ink) was made by embossing with a white powder then I just filled in between the lines with my color. You can see I have some shading that was easy to obtain with the powders that's a bit harder with the distressed inks or watercolors. I only used 1 color to which also gave me the more washed out pastel look. 


Thursday, February 14, 2019

Happy Heart Day

Not my normal day to publish cards but I had one more Valentines Day card I wanted to share and my assortment of cards wouldn't be complete without a card with some flowers. 

The heart die is from Papertrey Ink and the background stamp is from Stampin Up which I used a slate grey ink from Simon Says Stamp. Flowers are an assortment of stuff I had and that pretty glittery blue butterfly is from Jennifer Bowlin when I used to get her kits. The leaves and flourish are dies. The flourish is from MFTS, the pine tree branch and green leaf from Martha Stewart and the another leaf die from Poppystamps. 

Hope your day is filled with lots of love. 


Wednesday, February 13, 2019

Tag Cards

This set of cards were from smaller stamps that I wanted to used tags and basically did a duo of the same style card. 

This stamp is from Hero Arts, I also diecut a few silver hearts and kept it basically a black and white theme. 


For this card I used an older stamp from a company called and American Stamp. It always cracks me when I read it. I used more shiny paper for the hearts and love diecut. Paper for both cards was from MFTS.


Monday, February 11, 2019

Distressed Love

Inspired by Tim Holtz's video for his new releases I decided I needed to use some of his products for a Valentine's card. I basically used the picket fence paint and a few of the inks (Pickled Raspberry, Candied Apple and Festive Berries) to get the background color on a watercolor panel then stamped the various images on top and spritzed it with some Perfect Pearls and then added a die cut and a few stickers.

Not sure who I will give this card to as most people I know aren't into the distressed card panels which is kind of a shame because the I like making them.


Since Feb 14th is so close I am also showcasing another cards.

This one I decided to create a card using a bunch of leftover supplies. The embossing panel was leftover from a panel that I first tried using this background for the HVD card but didn't like it so I used the swiss dot on that card. I also diecut a heart too large so diecut it again and am using the remnants of that and a leftover diecut love word that I did in both silver and red but ended up using the red so the silver was leftover. Then I embossed the word sentiment and added some epoxy hearts to complete this card.


Wednesday, February 6, 2019

HVD

On Monday I shared the heart shaker card and of course and after I diecut the heart I was leftover with foam shaped heart and pp heart inserts that fit perfectly together and of course not wanting to waste them, what else to do then make a quick and easy Valentine's Day card. 

I broke out my swiss dot embossing folder (you remember those, right) for this one and that sentiment is actually a sticker from Crate paper. So all I needed to do was assemble it all and toss on a glitter foam heart and wham bam it's done, easy peasy!


Monday, February 4, 2019

Sprinkled With Love

 After making my granddaughter a shaker card for her birthday I thought I would also make a Valentine's Day shaker card. I pulled out my older Papertrey Ink Sprinkled die and stamp set for this one.

As I mentioned before I take both the pp panel and my foam panel and diecut them together so they align nicely. Then I just stick the foam panel to my base cardstock fill it with some sequins then cut a piece of acetate and place it ontop then all I need to do is adhere the pp panel on top of all that. 

I wanted some shimmery and had just bought a red glittered piece of cardstock and Joann's so I used that and then all was left was to finish stamping the sentiment. I fuzted around with a speech bubble and also a strip but ultimately found a heart that I thought was the best fit. 

I think I may give this card to my youngest grandson because I'm pretty sure he'll appreciate the shaker part of this card.