Search This Blog

Friday, October 3, 2014

Little Back Cat

I was digging through my dies and realized I hadn't used my hexagon die from Papetrey Ink in quite awhile so I felt the need to use it and since I was on the path to make Halloween cards I attempted to make it work in a HW theme. I say attempted because I am not sure it really works here.

I think this is one of those projects that seemed better in head than how I executed it, but I gave it the good ol college try. I also used their kitty die along with the sentiment stamp. I cut the label die from spellbinders and felt like it needed something more.

Using my basic grey flourish stamps I stamped along the edge and then felt some toile would be a good add on. It's the perfect ribbon for HW projects.

Having done that I still felt like it need a bit of something else so I started adding sequins. Then that led me to adding sequins to the toile which I really kind of liked, but have to say the card is eh..ok I am just not in love with it but I guess that's the way it is with some projects. On to the next card.


Wednesday, October 1, 2014

Stampin Up Image - HW card

So I haven't played with my copics in awhile and needed to start getting some Halloween cards done so I decided this fun but way old image from Stampin Up would accomplish both needs or rather desires.

I also used my Memory Box Spider frame die to emboss instead of cut to add a nice texture to my background. If you didn't know already you can easily take a die and use it to emboss by replacing your cutting plates with your embossing plates, how much simpler could that be.

I am also using some scrap pieces from my Echo Park HW paper from about 3 years ago. And of course pulled out that trusty drippy goo punch from Martha Stewart. Added in a few bits of bling, stamped sentiment on vellum, wooden embelly misted with some orange coloring and a strip of washi tape. The spider and bat dies are from Judith. Now on to my next card.

Monday, September 29, 2014

Halloween Card Repeat

So a week or two back I made this card and because I used dies I had lots of leftovers and what better way to use leftovers than to make another card. So not the exact same but similar.

Friday, September 26, 2014

Wooden Blocks

So I had to run into our local Hallmark store a few months back to grab some wrapping paper and I spied these wooden blocks with painted words on them and thought what a clever idea. Well you know I wasn't going to buy those when they were perfectly simple to re-create.

I hit up my local lumber store, picked up some remnants for free, had my dh chop these 2x6  into  9 inch blocks (I am sure the lumber guys would have obliged me equally as well). I wanted to stain them black but dummy me forgot to buy the wood stain. Oh well I was already on a roll using Tim Holtz Distressed Ink for my other project so lets just try it out on wood..works pretty good.

I misted the ink with water and painted the edges with the excess runoff using a foam dauber. I had to apply the ink two or three times. Basically I swiped the pad against the wood grain then rubbed it in with a foam dauber..added just a bit of water to help the ink soak into the wood and let it sit overnight to let the ink cure up, which it did so there was no fear of ink rubbing off while you handled the wood.

Next I cut the letter stencils from the Silhouette and their stencil material which if you haven't tired it is about the best thing ever. It's super adhesive without being overly sticky. So I can lift it multiple times yet it doesn't overly grab and it still sticks darn well.

I rubbed the stencil firmly all over to make sure all the edge were sealed and used a foam brush to daub on white paint on and then lightly painted with the brush it to give it a brush stroke feel.

Came out pretty good, this one is for my dd.

 
So after I completed my dd and the paint was drying I was half tempted to throw some of that excess glitter I had from making my skull from the Wicked letters, but decided against it.
 
However as I was putting the stencil down and painting on the white paint for mine, I thought hey I could toss some green glitter in the glitter mix and do it to mine. So what they hey that is exactly what I did. I just wished I would have spritzed it with hairspray before I removed the stencil so I wouldn't have all those pesky bits here and there. Oh well I still like the final product.
 
I also just want to mention that I saw the blocks in various shapes and sizes so you could do 2x4 and cut in 12 inch lengths or do shorter for Love, etc and perhaps go with a 2x8 or even a 4x8 and cut whatever length you like..I think you get the idea. These would make great inexpensive Christmas gifts.


Wednesday, September 24, 2014

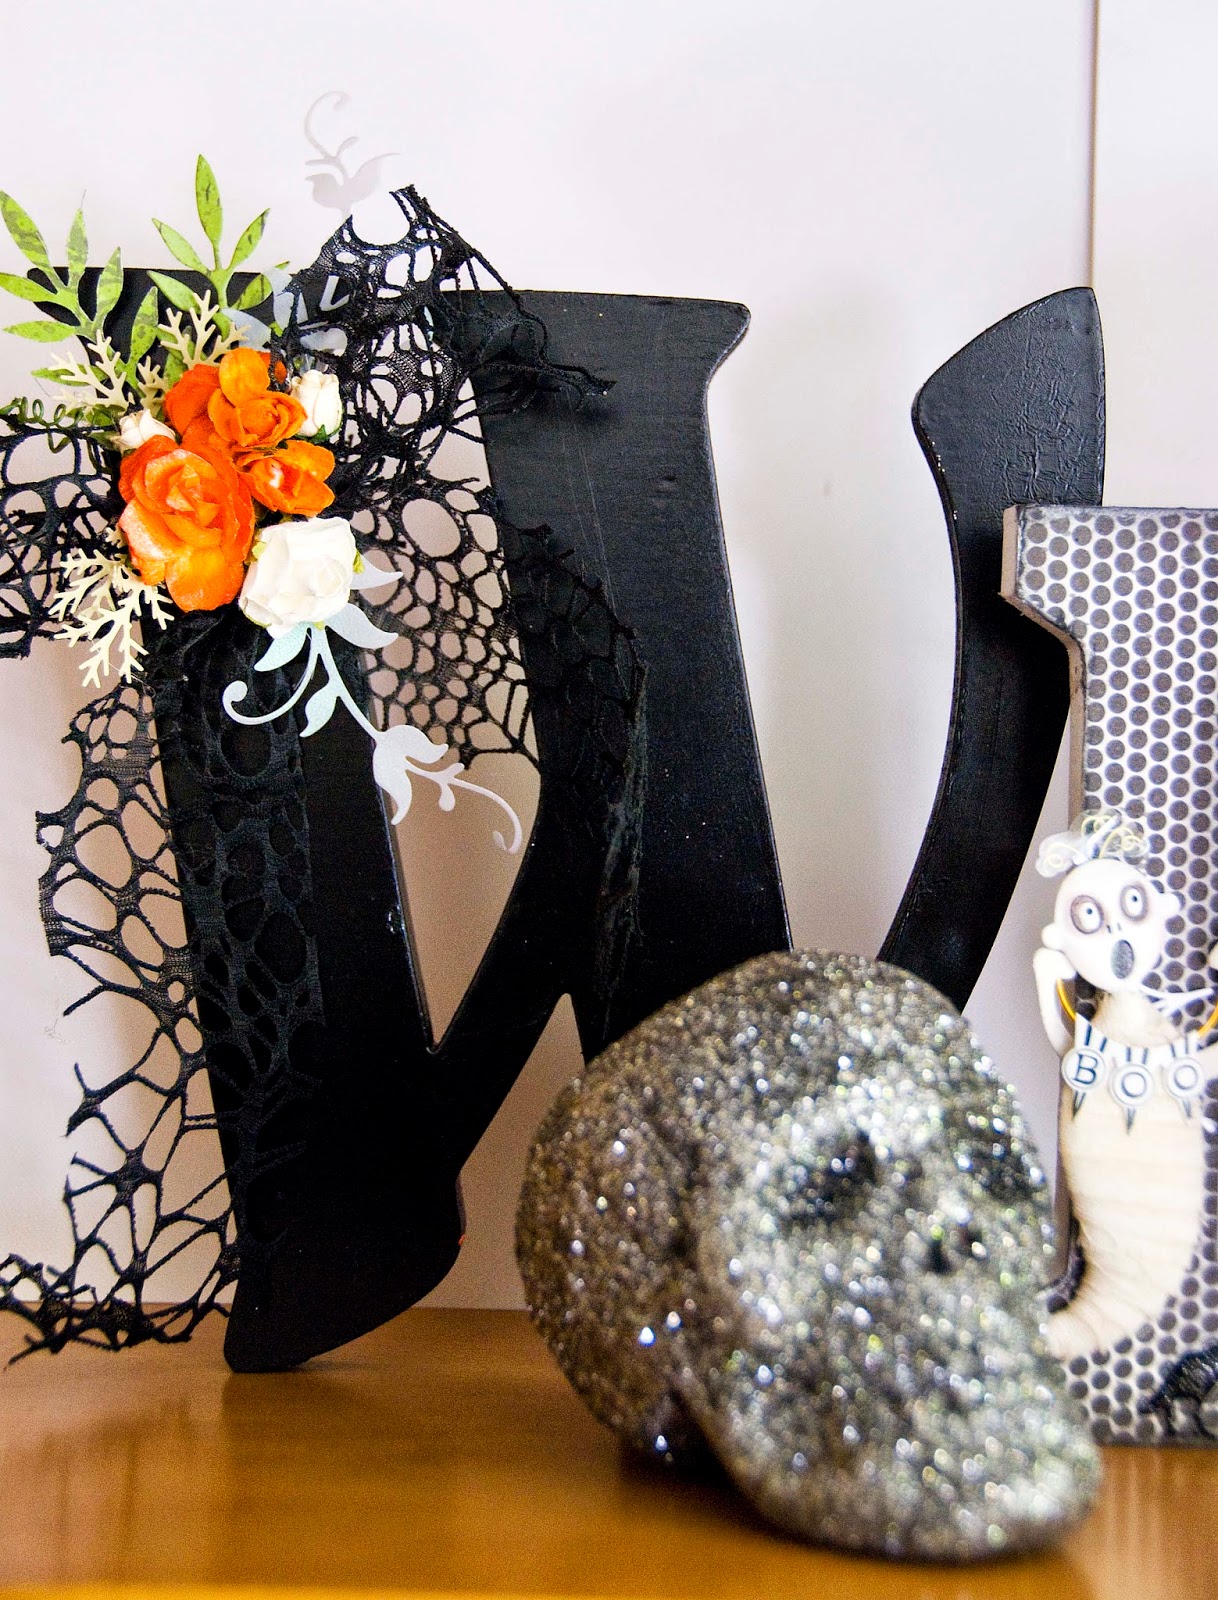
Wicked - Altered Letters

I was in Joann's the other day and walked by those big chunky letters and it had been awhile since I had altered any letters. I thought perhaps my dd might like something for Halloween. Figured Happy Halloween was a bit long and more than I wanted to spend or do so opted for Wicked as a better solution.
 
At first I was grabbing all the same size and style then the thought occurred to me that if I mixed them it might be more fun so grabbed various sizes and styles. I am sure the shoppers thought I was nuts as I placed them on the floor trying to find a suitable combination.
 
Again (love my dh) had my dh paint some of them black and kept the others white. I then proceeded to alter each letter one by one, deciding whether to leave as is or cover in pp and adding various elements.
 
For the W I really really wanted to use red flowers but stupid me had already used some of the pp with orange in it and there was no way I was going to redo that letter so opted for using orange flowers instead.


This was a 3D sticker I had purchased last year, I believe it was KandCompany. 


 I have always loved the look of a flock of bats so decided to use that inspiration on my letter C.Bats were die cut for a couple different QK dies.


The K seemed easy enough. I had a bit of faux spider web sitting on my desk from my graveyard luggage and wrapped it around. And of course that made me think of spiders and remembering the Indiana Jones ride at Disney that has a wall covered in bugs figured I could easily do the same with some spiders.
 
These spiders were die cut from a Memory Box die and used a foam pad and stylus tool to give them a bit of a pop in the body and hot glued them to the letter.
 
 
This is the stupid letter I covered in orange. I then added some more orange flowers and this tiny skull that is a packaging element from the bag of skulls I bought for my crow box. Decided it also needed something else so used my QK haunted tree die cut. 
 
 
I also decided this display would benefit from a glittered skull so had a foam skull that I also bought not knowing what I would do with, and decided to glitter it with spray on adhesive and a mix of silver and black glitter. I think it works.


I am sure my dd will love this. My ds told me I should sell it instead of giving it to his sister so I guess that means I did a pretty good job!


Monday, September 22, 2014

Marquee Letters

So I was in Michaels the other day and spied these metal letters (similar to what is shown below) that I really liked and picked up not sure what I wanted to do with them but envisioned me altering them in some manner.


Then over on the Feed Your Craft message board, Elise had mentioned in a post that she wanted to do some marquee letters, well of course I was very intrigued and thought hey I can do that with these letters.

I must confess I hunted around for my lights because I needed smaller than the typical lights found used for the marquee style of lighting..sadly I just couldn't find any smaller than what I purchased and I didn't want to use the smaller LED lights that others have used because I felt that it wouldn't look quite right, but I do like the fact that they were orange so what the heck I tried them out.

I did also enlist the help of my dh and his power tools, which he then pre-drilled the holes than drilled them to the size I needed but ack, they were jagged and not very pretty as you can see here.


He then used his drummel tool and made the holes prettier, sanding down all those jagged and ugly edges, making the holes well more like holes.
 

Once the holes were done I proceeded to use some Tim Holtz black distressed ink and darkened my letters a bit so they weren't quite so shiny and added in my bulbs (Yes they are just a bit too big)

 
All the letters combined

 
Then came the big test, to turn them on. I must tell you I was nervous because according to my dh I can not have the metal from the light bulbs touching the metal on the letters, and some of the bulbs didn't seem to fit all the way down as one hoped they would.
 
Fears averted and found that 3 bulbs weren't lit and then one decided in the last minute to turn on but two still weren't cooperating as you can see.
 
 
After switching a few bulbs and replacing another they final all lit. I love the overall look of these and know the perfect place for them to sit; in my kitchen on a window sill that adjoins the porch so all our night time visitors can enjoy them. 
 
Thanks Elise for the wonderful idea and have to admit I am thinking some colorful LED lights and perhaps making some box letters from chipboard would be a nice project for Christmas time.


Friday, September 19, 2014

Time for a Halloween Card

So in the mist of all these Halloween projects I couldn't resist the urge to make a card. I was hoping to have two to share today but ran out of time.

Using Papertrey Ink die, Kraftin Kimmie sentiment stamp and a Memorybox spiderweb die along with Teresa Collins pp, a few enamel dots and an epoxy sticker. The black twine was just regular twine that I then colored with a black marker..a little time consuming but I liked the finished look of it.

BTW - I have some marquee letters coming shortly. My lights arrived today (I wanted orange globes) and told my dh I need my wood for some signs I want to make done for this weekend. So hoping to have more projects next week.