Search This Blog

Wednesday, July 29, 2015

Watercolor strikes again

Hello fellow readers well I was MIA for a bit because over the weekend we undertook a huge task, we remodeled our garage and ai yi yi, it was a lot of work. Took me a day just to recover. My youngest ds and I came up with the idea and were going to surprise my husband when this all started but we quickly realized that wasn't going to happen so we filled my dh in on the project and being in construction lets just say one thing led to another.

If you don't care about seeing any pictures or what not I will spare you the details but for those of you who do just keep going.

So back to scrappy goodness. The My Favorite Things blog has been having a contest using color theory and while my initial thought was to join in on the contests I just didn't get around to it, but their challenge inspired this card. I was initially going for monotone but I think this doesn't quite apply since some of Ranger's Distressed Inks had a green tone to them despite being blue in origin.

 The stamp and die are from Papertrey Ink


And for those of you interested in my remodel I hate to tell you that I forgot to take photos when the old cabinets were still intact, but alas I came home one day and my son had removed them. The one side was basically a wall of those white particle board cabinets you find at Home Depot.
 
Most of our garage already had dry wall installed but there were a few places missing and my dh wanted to go back over and make sure everything was properly taped and prepped. That's him below
 
 
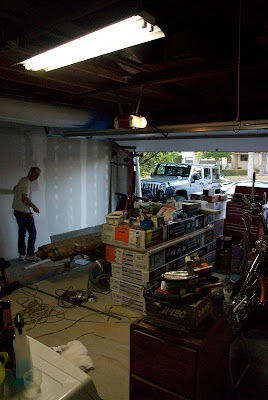
This was part of the mess that my ds and I emptied on Friday afternoon.

 
As you can see we had a mess everywhere you looked, part from empting the garage and part from the garage being packed with way too much stuff.


 This set of cabinets over the washer and dryer we left.

 
When I say we had a lot of stuff, we had a lot of stuff..or I should say my husband has a lot of stuff. This is our patio full of junk.
 
 
This is a snapshot of the walls after my dh sprayed on some texture, thank goodness for power tools my hubby did most of them Friday night and what was leftover on Sat am

 
We started painting the walls where the texture was already dried from the night before.
 
 
Now that the painting is done we needed to start emptying the garage so we could lay down the flooring, yeah we put in vinyl flooring. Very easy to do but at this point my son left for work and guess who got stuck with helping my dh lift it. I am sure a few swear words escaped my mouth during this time.
 
 
 It's looking nice and tidy wouldn't you say.

And then as my son slept in Sunday morning mom was out there assembling cabinets as my dh did final paint touchups. Once he was done he put the doors on and leveled the cabinets.

 
Here is half of the garage. After my ds got up and helped he left for work again, I am beginning to think he planned that. So dh and I once again dealt with the other half of the flooring and cabinets. He finally returned to help assemble the last two cabinets. And didn't believe mom did one set correctly so he took it all apart and redid it. I told him feel free and decided this was a nice opportunity for a break. Needless to say mom did them right. The manufacturer had a flaw with them but they were built as designed.
 

Here is the other half, but we still need to install the upper cabinets over the workbench and add a few things like trim around the doors. We basically ran out of time. So maybe this weekend it will get the final steps completed. DS has already started putting stuff back so my patio is returning to normal but there is still much to organize as it goes back in. Can't wait for this to all be done.

And I am thinking of painting these cabinets above the washer and dryer but they are laminate and I guess they need to be treated specifically for painting or the paint eventually blisters. And if anyone cares these were Gladiator Steel cabinets which are made by Whirlpool and the vinyl flooring with a coin pattern. They can hold up to ~50lbs per shelf more or less depending on the overall size of the cabinet which is perfect for all of my dh's tools. 

 
And now you know why nothing got posted on Monday, I was literally worn out. There was a lot of heavy lifting, bending over, cleaning and all the cardboard had to get cut up for recycling the next day. Good news is I lost 2.5 lbs which I am going to attribute to the long days of physical labor.


Wednesday, July 22, 2015

One more moving card

I have officially moved my mother but her new house is in chaos as she decided it needed an all new kitchen, hardwood floors, new paint, molding and tile. We barely got her moved out of the old house and I spent all day Friday unpacking and putting away her boxes that consumed her garage so at least she had some bit of organization to it.


Monday, July 20, 2015

Quilt Time

Another weekend zapped by sewing. I have pretty much figured it takes three full days to sew this quilt. It's the second Halloween quilt I have made and this one is all mine. I really love the fabric and since there was leftovers you know there is a skirt to follow.

This is the back material, I really wish I had more of this but alas I ended up making the quilt longer rather than the wider width I actually bought the yardage for so ended up using it all except for some scraps.


Here it is in it's entirety
 
Close up of the quilting, nothing fancy just some random lines. Time like this I wish I had the $ to send it out for long arm stitching then I could have a nice fancy design. 


Well this has officially put me in the mood for Halloween.


Wednesday, July 15, 2015

TGF - Cheeky Birthday

Here is another card for this month's challenge at The Greeting Farm. Using the Cheeky Rockabilly stamp colored with copics, some more Heidi Swapp pp, new circle stamp sentiment from Simon Says, and a few odds and ends to complete the card.

As you can see I decided to fussy cut a bit of the stamp so she hung off the circle.

Monday, July 13, 2015

Furry Friends

I am running a bit late today because as you know my mother is moving and we are making a mad dash in these final days to get her moved from a 3500 sq ft home down to a 1900 sq ft home and lets just say she's got a lot of stuff. We were at her house all day until late in the evening so I didn't get a chance to get the blog ready for my usual 5am launch.

Any hoo Simon Says Stamp Wed Blog had a Furry Friend challenge and I thought I would participate and give some of my stamps a little love. I also opted to color in some sky which I don't normally do but it was time to step  out of my comfort zone a bit.

The pp is from Heidi Swapp and I really don't recommend it, it's pretty thin. The stamp is from Stampin Up, colored with copics of course and the sentiment die and stamp is from Papertrey Ink.


Wednesday, July 8, 2015

TGF - Red, White and Blue

The Greeting Farm is having another month long challenge and up for grabs is a $50 gift certificate so you know I had to give it a shot.

I thought I would go with a Shaker card this time for a fun interactive card. I am always amazed when I can actually make a shaker card because nine times out of ten I can't remember how and feels like I have no clue what I am doing.

Monday, July 6, 2015

Still Sizzlin

Yesterday was my hubby's birthday so you know I had to make him a card. I don't think I have bought a birthday card for at least the past 5 years so there is no way I could start now.

Guy cards always seem to be a challenge but I took the easy road and decided to use one of the Art Impressions stamps and color him a very simple card. I originally bought this rooster guy for my father in law but hey no rule says I can't use it just for him, right.

Thursday, July 2, 2015

Mini 4th of July Cupcakes

So I was feeling a bit festive and decided to whip up some mini red velvet cupcakes for work. I also was meeting a friend for lunch and since he doesn't work with me anymore I figured he would love to have his own.


I had purchased this gift box board punch from We R Memory Keepers just for this occasion. I hadn't opened it so I took it for a trial run. It wasn't too difficult but I could see some things needed improvement like using nice sturdy double sided tape to hold it together to help make it less flimsy and to tape down the wings that were created from pressing the edges together so that they would lay flat.
I also learned to take those creases seriously and give them a nice firm and crisp pre-fold. I can see this board punch will be a nice little addition to my toolset because it makes a vast array of box sizes.
This was my trial version
 
And here is the final product, it held 4 mini cupcakes very nicely.


Wednesday, July 1, 2015

Another one bites the dust

So finally finished this quilt I made for my son as a Christmas gift. I was kind of intimidated by the triangles but honestly I took it slow and found that the top went together fairly quickly. What I didn't envision was the hours needed to quilt all those triangles.

This quilt is called a Shark Tooth quilt and I by no means had any creativity to speak of other than I did choose to change the direction of the angles on every other row for the triangles as well as the width of the stitching and stitching half triangles straight rather than angled. Oh and the layout of the triangle pattern.

Now I will have you know that my son saw me make this quilt and when it was done I asked him what he thought of it, his exact words "It looks like something you would buy in a store, but I wouldn't buy it because it's not my style. It looks too childish with the triangles." <insert eye roll> Um yeah he will still be getting this quilt for Christmas and he will just have to learn to like it.

Here is the quilt before I washed it, uncrinkled.


And after it was washed

 
Finally remembered to take a photo of the back

 
The whole enchilada


Up close..all that stitching.