
Monday, September 29, 2014
Halloween Card Repeat
So a week or two back I made this card and because I used dies I had lots of leftovers and what better way to use leftovers than to make another card. So not the exact same but similar.
Friday, September 26, 2014
Wooden Blocks
So I had to run into our local Hallmark store a few months back to grab some wrapping paper and I spied these wooden blocks with painted words on them and thought what a clever idea. Well you know I wasn't going to buy those when they were perfectly simple to re-create.
I hit up my local lumber store, picked up some remnants for free, had my dh chop these 2x6 into 9 inch blocks (I am sure the lumber guys would have obliged me equally as well). I wanted to stain them black but dummy me forgot to buy the wood stain. Oh well I was already on a roll using Tim Holtz Distressed Ink for my other project so lets just try it out on wood..works pretty good.
I misted the ink with water and painted the edges with the excess runoff using a foam dauber. I had to apply the ink two or three times. Basically I swiped the pad against the wood grain then rubbed it in with a foam dauber..added just a bit of water to help the ink soak into the wood and let it sit overnight to let the ink cure up, which it did so there was no fear of ink rubbing off while you handled the wood.
Next I cut the letter stencils from the Silhouette and their stencil material which if you haven't tired it is about the best thing ever. It's super adhesive without being overly sticky. So I can lift it multiple times yet it doesn't overly grab and it still sticks darn well.
I rubbed the stencil firmly all over to make sure all the edge were sealed and used a foam brush to daub on white paint on and then lightly painted with the brush it to give it a brush stroke feel.
Came out pretty good, this one is for my dd.
So after I completed my dd and the paint was drying I was half tempted to throw some of that excess glitter I had from making my skull from the Wicked letters, but decided against it.
However as I was putting the stencil down and painting on the white paint for mine, I thought hey I could toss some green glitter in the glitter mix and do it to mine. So what they hey that is exactly what I did. I just wished I would have spritzed it with hairspray before I removed the stencil so I wouldn't have all those pesky bits here and there. Oh well I still like the final product.
I also just want to mention that I saw the blocks in various shapes and sizes so you could do 2x4 and cut in 12 inch lengths or do shorter for Love, etc and perhaps go with a 2x8 or even a 4x8 and cut whatever length you like..I think you get the idea. These would make great inexpensive Christmas gifts.
Wednesday, September 24, 2014
Wicked - Altered Letters
I was in Joann's the other day and walked by those big chunky letters and it had been awhile since I had altered any letters. I thought perhaps my dd might like something for Halloween. Figured Happy Halloween was a bit long and more than I wanted to spend or do so opted for Wicked as a better solution.
At first I was grabbing all the same size and style then the thought occurred to me that if I mixed them it might be more fun so grabbed various sizes and styles. I am sure the shoppers thought I was nuts as I placed them on the floor trying to find a suitable combination.
Again (love my dh) had my dh paint some of them black and kept the others white. I then proceeded to alter each letter one by one, deciding whether to leave as is or cover in pp and adding various elements.
For the W I really really wanted to use red flowers but stupid me had already used some of the pp with orange in it and there was no way I was going to redo that letter so opted for using orange flowers instead.
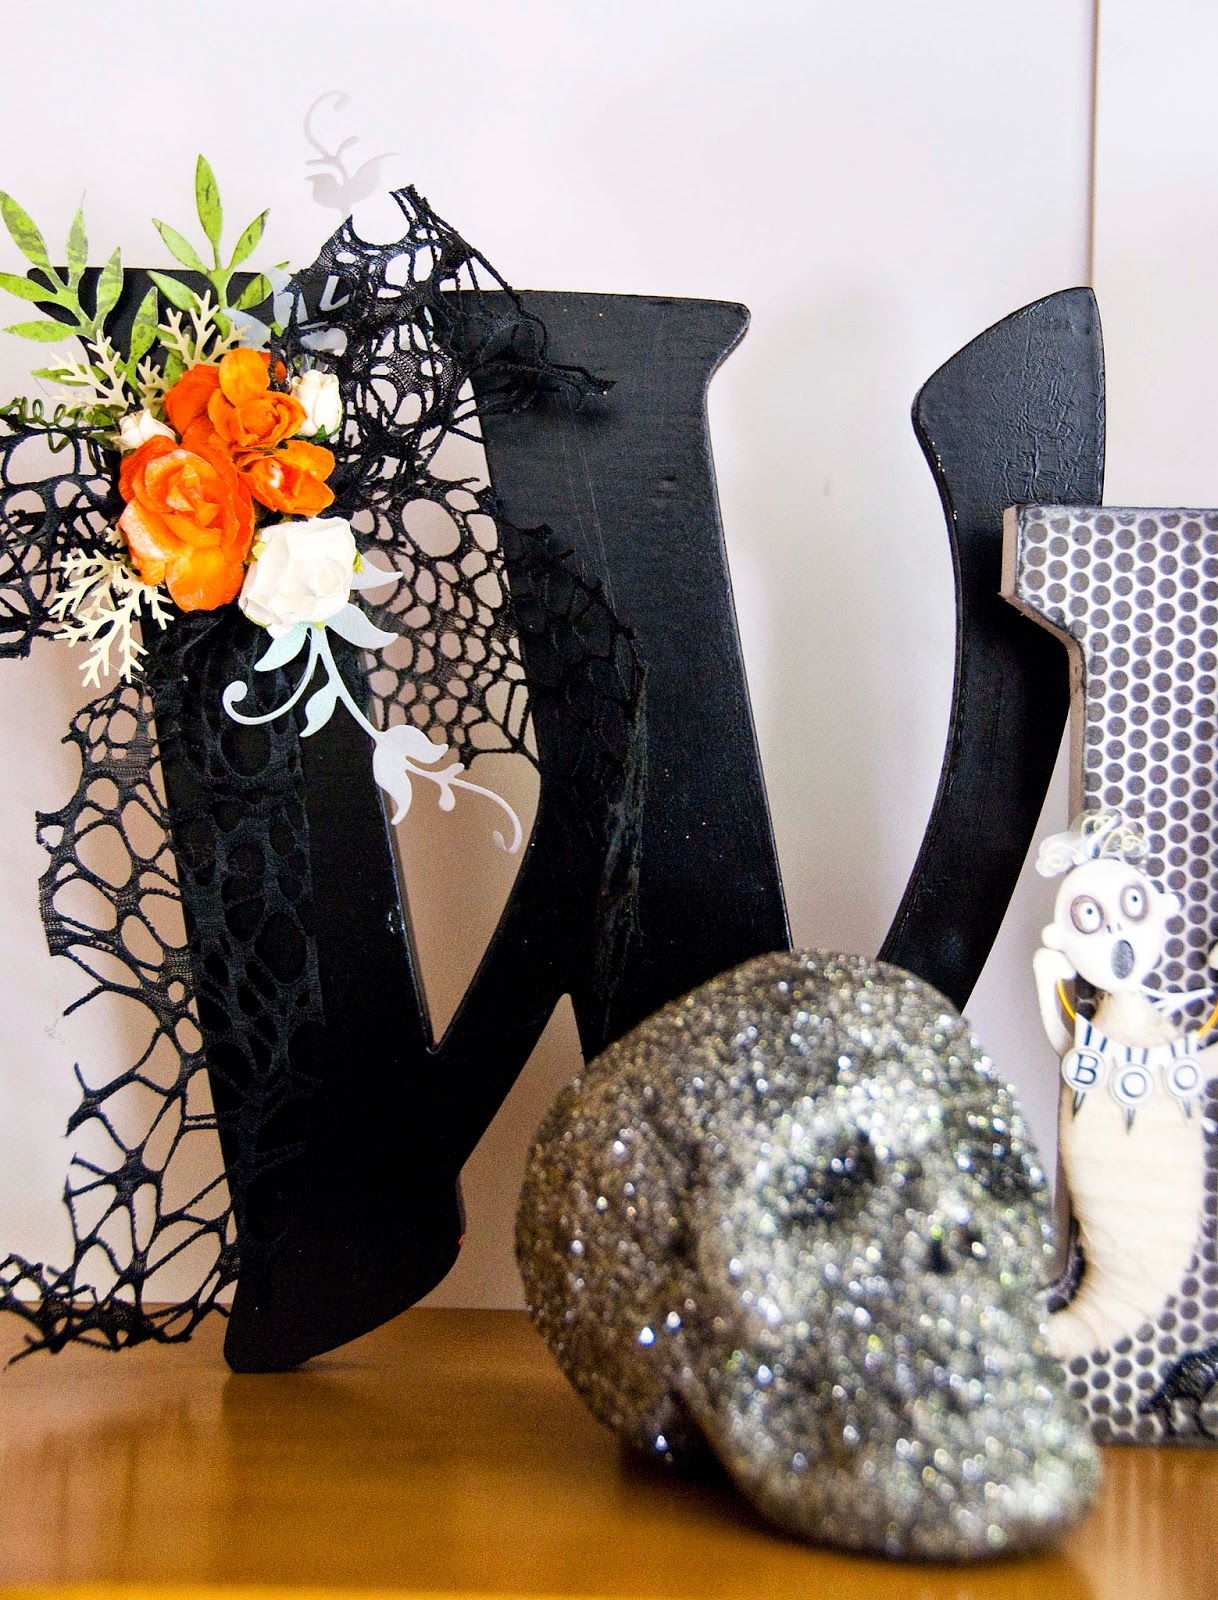
This was a 3D sticker I had purchased last year, I believe it was KandCompany.

I have always loved the look of a flock of bats so decided to use that inspiration on my letter C.Bats were die cut for a couple different QK dies.


The K seemed easy enough. I had a bit of faux spider web sitting on my desk from my graveyard luggage and wrapped it around. And of course that made me think of spiders and remembering the Indiana Jones ride at Disney that has a wall covered in bugs figured I could easily do the same with some spiders.
These spiders were die cut from a Memory Box die and used a foam pad and stylus tool to give them a bit of a pop in the body and hot glued them to the letter.

This is the stupid letter I covered in orange. I then added some more orange flowers and this tiny skull that is a packaging element from the bag of skulls I bought for my crow box. Decided it also needed something else so used my QK haunted tree die cut.

I also decided this display would benefit from a glittered skull so had a foam skull that I also bought not knowing what I would do with, and decided to glitter it with spray on adhesive and a mix of silver and black glitter. I think it works.

I am sure my dd will love this. My ds told me I should sell it instead of giving it to his sister so I guess that means I did a pretty good job!
Monday, September 22, 2014
Marquee Letters
So I was in Michaels the other day and spied these metal letters (similar to what is shown below) that I really liked and picked up not sure what I wanted to do with them but envisioned me altering them in some manner.

Then over on the Feed Your Craft message board, Elise had mentioned in a post that she wanted to do some marquee letters, well of course I was very intrigued and thought hey I can do that with these letters.
I must confess I hunted around for my lights because I needed smaller than the typical lights found used for the marquee style of lighting..sadly I just couldn't find any smaller than what I purchased and I didn't want to use the smaller LED lights that others have used because I felt that it wouldn't look quite right, but I do like the fact that they were orange so what the heck I tried them out.
I did also enlist the help of my dh and his power tools, which he then pre-drilled the holes than drilled them to the size I needed but ack, they were jagged and not very pretty as you can see here.


Once the holes were done I proceeded to use some Tim Holtz black distressed ink and darkened my letters a bit so they weren't quite so shiny and added in my bulbs (Yes they are just a bit too big)


Then over on the Feed Your Craft message board, Elise had mentioned in a post that she wanted to do some marquee letters, well of course I was very intrigued and thought hey I can do that with these letters.
I must confess I hunted around for my lights because I needed smaller than the typical lights found used for the marquee style of lighting..sadly I just couldn't find any smaller than what I purchased and I didn't want to use the smaller LED lights that others have used because I felt that it wouldn't look quite right, but I do like the fact that they were orange so what the heck I tried them out.
I did also enlist the help of my dh and his power tools, which he then pre-drilled the holes than drilled them to the size I needed but ack, they were jagged and not very pretty as you can see here.
He then used his drummel tool and made the holes prettier, sanding down all those jagged and ugly edges, making the holes well more like holes.
Once the holes were done I proceeded to use some Tim Holtz black distressed ink and darkened my letters a bit so they weren't quite so shiny and added in my bulbs (Yes they are just a bit too big)
All the letters combined
Then came the big test, to turn them on. I must tell you I was nervous because according to my dh I can not have the metal from the light bulbs touching the metal on the letters, and some of the bulbs didn't seem to fit all the way down as one hoped they would.
Fears averted and found that 3 bulbs weren't lit and then one decided in the last minute to turn on but two still weren't cooperating as you can see.
After switching a few bulbs and replacing another they final all lit. I love the overall look of these and know the perfect place for them to sit; in my kitchen on a window sill that adjoins the porch so all our night time visitors can enjoy them.
Thanks Elise for the wonderful idea and have to admit I am thinking some colorful LED lights and perhaps making some box letters from chipboard would be a nice project for Christmas time.
Friday, September 19, 2014
Time for a Halloween Card
So in the mist of all these Halloween projects I couldn't resist the urge to make a card. I was hoping to have two to share today but ran out of time.
Using Papertrey Ink die, Kraftin Kimmie sentiment stamp and a Memorybox spiderweb die along with Teresa Collins pp, a few enamel dots and an epoxy sticker. The black twine was just regular twine that I then colored with a black marker..a little time consuming but I liked the finished look of it.
BTW - I have some marquee letters coming shortly. My lights arrived today (I wanted orange globes) and told my dh I need my wood for some signs I want to make done for this weekend. So hoping to have more projects next week.
Wednesday, September 17, 2014
Fall is coming
I feel the nip of cool weather in the morning and find myself eagerly awaiting the full onset of fall. I have already partaken in a luscious Pumpkin Spiced Latte, bought some Samuel Adams pumpkin beer and felt the need to indulge in a few fall tasty treats and put on my apron and fired up the oven for a trio of yumminess.
First up not really a fall weather treat but I was in the mood for some cookies. I am calling these fifty fifty cookies because I didn't have enough chocolate chips to make them a true choc chip cookie and added peanut butter chips I had on hand. I will also tell you that if you bring your butter to room temp and whip the bloody {bleep} out of it with the sugar..you will get a very soft and fluffy cookie. I do put my batter in the fridge between baking to keep the cookie from going flat.

Next up was some ever loving pumpkin snack cake. I really made this for work but I love pumpkin so had to snitch of few pieces to keep at home just for me. I don't think they will even miss it.

Lastly I made apple bread and the only thing I can think that would make this even more better would be a drizzle of some cream cheese icing..about the most perfect fall food I can think of next to anything pumpkin. I baked two loaves, one for the boys to have at home and one for work which I took with the pumpkin snack cake.

First up not really a fall weather treat but I was in the mood for some cookies. I am calling these fifty fifty cookies because I didn't have enough chocolate chips to make them a true choc chip cookie and added peanut butter chips I had on hand. I will also tell you that if you bring your butter to room temp and whip the bloody {bleep} out of it with the sugar..you will get a very soft and fluffy cookie. I do put my batter in the fridge between baking to keep the cookie from going flat.
Next up was some ever loving pumpkin snack cake. I really made this for work but I love pumpkin so had to snitch of few pieces to keep at home just for me. I don't think they will even miss it.
Lastly I made apple bread and the only thing I can think that would make this even more better would be a drizzle of some cream cheese icing..about the most perfect fall food I can think of next to anything pumpkin. I baked two loaves, one for the boys to have at home and one for work which I took with the pumpkin snack cake.
Monday, September 15, 2014
HW Decoration - Easy Peasy
So I have been busy with my Halloween altered objects and in the mixt of it all stumbled across this frame I bought at Michaels in the clearance section. It was originally bronze but a bit of black spray paint helped it along. I have another smaller frame I considered but the wrought iron look to this one spoke more of Halloween to me than the plain wood frame from the other one.
I had seen those collection of paper butterflies and hearts that people put in a larger frame and thought it would be kind of fun to do it with bats, except on a much smaller scale. So punched a few bats and glue dotted them onto some older Echo Park pp and tied on some toile. I did leave out the plastic insert so the bats could be a bit 3D-ish.
I think this will work splendidly in a mix of other Halloween items on my shelf.
Friday, September 12, 2014
Luggage Graveyard
I was patrolling the aisles of Michaels and came across this piece of luggage that was discounted and saw all the Halloween decorations in the store I thought it would be fun to alter it into a graveyard.
My first thought was to have the lid close but once I started creating trees I knew that wasn't possible. I also didn't want to spend a fortunate on small items but bought what I could like the fence that I altered with ink to distress it.
I did see some small dolls and figured I could make them zombies so with the help of my son I painted them a grayish green and added blood.
The floor of the graveyard is a mix of moss and the trees were created on accident. I combined a bunch of twigs and wired them together. I originally was going to spray paint them black but grabbed a can of rubberizing material that my dh used when I took a pot and turned it into a water feature (we sprayed the inside of the pot to keep the water from seeping out). And I immediately noticed it was not paint but loved the effect so it was a great mistake.
I added bits of moss to give it that aged old tree effect and have to say was disappointed in not finding something better from graves and crosses..so I improvised best I could.
I plan on giving this to my dd. I think she will like it..it's kind of fun to look at the details.
Wednesday, September 10, 2014
Crow Box
Crow box sounds kind of silly but I didn't know what else to call this. I was hunting for some ideas on Pintrest when I saw a few projects similar to mine that placed a crow on a box. I immediately loved that idea and knew I had plenty of boxes on hand that would I could readily use.
I love vintage (Country Living has been my decorating bible since I was 16) and was inspired to make this a vintage themed project. I used some scrap pp to cover the bottom and just die cut a circle from black cardstock for the top. I decided the scallop beige edge was a nice tone already and to leave it as is.
Adding bits of items here and there I built up the top of the box with flowers, skulls and a spider then finished it with toile and a stamped sentiment.
There are two skulls on the box (which the lid does come off by the way) one in the front and the other towards the back. Personally I love that I was able to use them as is and they didn't require additional distressing.


I created both paper flowers using two different tools. This one above I used a Fiskars punch and the one at the top of the page was created using the Spellbinders die. Love how the make completely different styles of flowers.
I love vintage (Country Living has been my decorating bible since I was 16) and was inspired to make this a vintage themed project. I used some scrap pp to cover the bottom and just die cut a circle from black cardstock for the top. I decided the scallop beige edge was a nice tone already and to leave it as is.
Adding bits of items here and there I built up the top of the box with flowers, skulls and a spider then finished it with toile and a stamped sentiment.
There are two skulls on the box (which the lid does come off by the way) one in the front and the other towards the back. Personally I love that I was able to use them as is and they didn't require additional distressing.
Monday, September 8, 2014
Another Fall card
Here is another Autumn card. Hard to see but the base card uses a shimmery gold card stock. Butterfly is from Clearly Besotted stamps and banner die is from Stampin Up. Pattern paper is from Teresa Collins.

Friday, September 5, 2014
Gift Bags and Soap
Earlier this year I came across a beautiful soap mold and knew instantly that it would make great Christmas gifts and the more I ventured into buying soap making supplies the more I wanted to create extrodinary soaps.
I then found another equally beautiful mold and told myself that was enough for my gift planning but I still had grandiose ideas running in my head so decided I needed a professional looking package for my soon to be beautiful bars and decided on a simple muslin bag and planned on using my Cameo to cut out vinyl for my gift giving packaging.
This is my end result of all that planning.
The bags

This has a lavender scent. Unfortunately the coloring on these left flakes even though I mixed thoroughly.

The color on this is a bit more peach than in the picture. My internet is out so had to use my phone. Scent is called a love scent..but is a nice light fragrance.

This color is a bit more lighter as seen in the fist photo. The scent is sweet pea.

I hope my recipients enjoy them as much as I did making them.
The bags
This has a lavender scent. Unfortunately the coloring on these left flakes even though I mixed thoroughly.
The color on this is a bit more peach than in the picture. My internet is out so had to use my phone. Scent is called a love scent..but is a nice light fragrance.
This color is a bit more lighter as seen in the fist photo. The scent is sweet pea.
I hope my recipients enjoy them as much as I did making them.
Wednesday, September 3, 2014
Halloween Come'th
At least around here for me it is. I have a few things I am working on that aren't quite ready for show and tell so have a few sneak peeks if you will of things coming plus a Halloween card to share.
I will also let you know I was working on my Christmas gifts for the girlfriends and have those in the line up as well.
Didn't get as much accomplished as I'd like mostly because I unfortunately pulled a muscle in my back so I have limited sitting, bending and standing times. Today I am feeling better with the help of Advil , hot showers and a heating pad.
Up first is a photo of a card pretty much scraplifted from Papertrey Ink using their new release for August but adding my own touches.
Here are a few photos from my almost finished Zombie graveyard in a suitcase
And lastly creating a vintage inspired Halloween project using a crow and a box. Hope you can come back to see the completed projects.
Subscribe to:
Posts (Atom)