Search This Blog

Friday, November 29, 2013

Star Wars Exhibit Photos

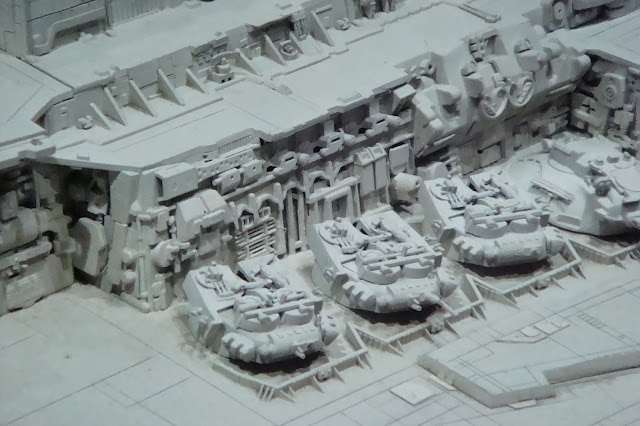
We are lucky enough to have the Star Wars Exhibit come into our local Tech Museum so I asked my eldest grandson if he would like to go and of course he said Yes!. He is interested in movie making so I thought he would enjoy seeing the props that were used in making the Star Wars films.

I have to say I was utterly impressed at the details that were on each item. Especially these ships even though we briefly see them on screen the details in real life are unbelievable.

Some facts that we learned, all evil ships were made in triangles.

The snow scene in the second film, aka V The Empire Strikes back was filmed in Norway and a huge storm came in the night before so all the crew were inside the hotel and they shot the scene in the doorway leading to the hotel. So poor Mark Hamilton had to go out into the cold while everyone was toasty warm in the hotel.

Some of the sounds for the ships and racers came from capturing the sounds of the LA freeway at 2 am and then forced that through a metal pipe and they also recorded a jet engine thursting the motors in reverse.


Wednesday, November 27, 2013

Have a Happy T-Day Everyone!

 Hope everyone has a safe and happy holiday. Thought I would share with you some well known artist and their renditions of what Thanksgiving means to them.

This is a painting by Jennie Augusta Brownscombe, one I really love titled First Thanksgiving


This one is by Jean Louis Gerome Ferris, a more well known artist perhaps. 


And who could forget this wonderful artist, Normal Rockwell famous for capturing the iconic American holiday dinner which completely reminds me of my childhood and celebrating Thanksgiving at my grandmothers.


And lastly who can forget Charles M. Schulz's peanuts gang who always bring a little smile to your day.

Enjoy this special time with your family and friends and we'll catch you a few pounds heavier on Friday.

Monday, November 25, 2013

Catching up on PL for the Kitty

Just catching up on sharing some more pages of my little or rather not so little kitty. She is growing so fast but still that in the cute phase.

And if anyone is a Star Wars fan come back on Friday and I will have soeme photos posted from my trip to the Tech Museum where they had a wonderful exhibit.


Friday, November 22, 2013

Vintage Tree in a Bottle

Here is another project I had been wanting to make (hate not having enough time to do everything I want.) Purchased the glass jar from Michaels and when I was at Hobby Lobby the other day I bought a 3 pack of those bottle brush trees. Now here is a little secret, if you want these bottle brush trees don't pay the $$ craft prices which run $3-5 for just one tree, but check out the doll house supplies..that's where I spied these cuties..3 for $1.99 such a deal.

Now typically no one likes them the dark green they come in so you can then bleach them. I bleached all three. Two are white and this one I pulled a litte early because I liked the soft pale green it became.

I hot glued the tree to the lid, hot glued around the tree and added some fake snow (which unfortunately you can't see because of the ribbon). Then stamped and die cut the banner, bent it back to give it the wave, added some star rhinestones then screwed on the jar and tied on the ribbon..and there you have it. A vintage tree in a bottle or rather jar.

Oh and once you bleach the trees, you can also dye them any color you want..pink, blue, etc. I am going to try one tree with some food dye because I know you can use RIT dye but who needs to buy that when you know you have food dye from Easter sitting in your cupboards. 

Wednesday, November 20, 2013

A fun little tree

After making the wreath or rather should I say after I got started with it I decided to make something a little different. I had this idea whirling in my brain for a few years (sad isn't it) and finally got it out and in the open.

I purchased a styraform cone, then cut felt (and fabric that had been backed with some iron-on backing so I could cut it) using a Spellbinders leaf die. Using plain old straight pins to attach the felt to the foam, I then just layered all these leaves onto the foam and topped the tree using a Star nestability, chipboard and Cosmo Crickets glitter adhesive paper.

Basically I cut two layers from the glitter paper, afixed one side to the chipboard and on the back side I stuck a pin halfway up then covered that with the second piece of glitter paper.

Lesson learned, I have to see if the Cameo can cut the fabric and felt (it's the wool boiled which is heavier than the felt you buy from Michaels so it cuts like butter)..because lets face it..that was a lot of cutting. This is something I also plan on giving my dd. I have a larger one to also make but not sure if I can finish it by this weekend. Unless I can get the Cameo to cut it all for me.


Monday, November 18, 2013

Holiday Christmas Wreath

Today I am sharing a Christmas wreath that I made for my daughter. Since she loved the Halloween wreath I made her so much I thought I would go ahead and make her one for Christmas as well. I showed her a couple of ideas and she liked this one best so I went with it. The white snowy branches really makes it a great winter time wreath as well as Christmas.

I first purchased a wooden wreath that you can find at any craft supply store, then I added some branches that I also purchased from various craft stores. Honestly I wish I just had a bush or small tree that needed a good pruning because I am not entirely happy with the fullness of the branches, but what's a gal to do and I didn't want to invest $100 on branches just to make the wreath.

After buying some extra branches and afixing to the wreath I sprayed the whole thing with a can of snow and let it dry over night. This is what it looked like. 


After letting it dry overnight I added some already white tipped pine cones (you know the ones that smell of cinnamon) some sprays of white balls and the various colored balls. Then I made a ribbon with some leftover stuff I had from last year and adorned that to the finished project. She hasn't seen it yet and is coming over this weekend so if she spies this on the blog before she sees it live I am sure she'll be twice as excited to see it in person.


Wednesday, November 13, 2013

Snow Card Take 2

Well I had to play with my snow die/stamp set just one more time. This time thought I would play with some sequins and {gasp} vellum paper and I'll have you know I actually had to go buy that paper, never in a million years would I ever have thought that would happen.

The sentiment stamping is not as clean as I would have liked to have it since it was only after I stamped did I realize there was a sequin right where I was stamping, but then that is what art work is..embracing the unperfect so hopefully my recipent won't mind.


Monday, November 11, 2013

Home Decor Projects

Technically this post is about one Home Decor item (the door swag) and one trial run on a Christmas Project (the cacti terrarium).

So I decided to venture south a bit (just a short 30 min drive) to explore Hobby Lobby and OMG! why did I not know about this place sooner? I was in sensory overload and it was all I could do to keep from buying the store out. I am not sure how, but I refrained from only buying things for some crafty projects that I had in mind but I did and best part is I know I can go back.

First up is this door swag that I made for myself (yea for me!) I had a previous wreath that my mother made me that was a good 13 or so years old and I figured it was time for an updo on it. This was really very simple I just gathered a bunch of fall foliage that was reduced in price since we are past Halloween and all the retailers are focused on Christmas so they put all the fall stuff on sale. I then tied them together with some wire, slapped on a burlap bow and voila..instant door modification.


This next project I also made for me but was really a trial run for two more Terrariums, one small like the one below and one much larger. My mother loves cacti and I saw some terrariums on pintrest and thought, yup excellent idea for Christmas.

This is a 6 in fish bowl that I bought at Hobby Lobby quite cheap (it was on sale) but you can also find them at Michaels and with a 40% off coupon, they are quite affordable. Then I hit up a local nursery for some cacti and since the small terrariums just need little pieces of cacti I was able to cut them from larger cacti which I will then use in the larger terrarium (10"). I believe all in all I bought 4 plants for ~$10 but will make as I said at least 3 terrariums from them. I filled the bottom with some cacti soil, plated the little cacti bits and then topped with decorative rock..any rock will do I just liked the look of white. Best part about cacti is they dont' require much maintenance so you don't have that whole misting terrarium of the 70s. (Don't forget to give them a quick sprinkling of some water once your finished..then they only require a bit of water once a week) I think my mom is going to love these.  


Friday, November 8, 2013

Another Card with a New Toy

Here is another Christmas card. I am using both old and new products. The Chevron die is new and still trying to play with it and figure out what works. The angel is an old ink/die set along with the new one from Papertrey Ink. The angel I stamped and embossed. The sentiment is an old old old stamp from Close To My Heart.


Wednesday, November 6, 2013

First Christmas Card of the Season

Now that we have completed Halloween, I need to start making this year's Christmas cards. I wasn't very good with my Halloween cards and some people just weren't on the receiving end this year. So I want to be sure that I make enough Christmas cards.

With that said here is my first card of the season. I just purchased this fun stamp and die set from Papertrey Ink and I love it so I am sure to be using it a few more times..isn't that always the way is it with new goodies though?

Monday, November 4, 2013

PL catch for the kitty

Just getting caught up after the last few busy weeks. It's funny but as much as I enjoy making these pages I have to wonder if I will enjoy looking back at it because I feel kind of silly making a album for the kitty. I know if it were of the kids then I could pass those photos along to them but I really can't pass these on to the cat. So hopefully I will really enjoy this later on and I just don't know it yet. 


Friday, November 1, 2013

Post Halloween Treat Bags

Well I guess I am a day late and a dollar short as they say. I made these treat bags and took them to work with the cookies but totally forgot to post them here for you to see. I was inspired by my dd's Halloween wreath that I made her and transferred that energy onto these bags. They were filled with a popcorn mix (pretzels, m&ms, cranberries and drizzled with chocolate) in a plastic bag that I tied with ribbon and then put in these bags so they could be reused by those who wanted.

The spiders were made from spider rings that Michaels was kind enough to put on sale for me so I got them for next to nothing. Chopped off the ring part, sprayed with adhesive glue and sprinkled with glitter.